Deciding on responsive image sizes and exporting from raw file
A method for deciding on what size image variants to create for publishing on a web-page.
The overall goal of responsive images is to minimize the amount of data the end user has to load. This is one way to work that out, keeping in mind that there is no hard and fast rule to getting this “right”.
Once you have determined a list of image sizes, I also included a method for creating those images from a raw image file using darktable-cli.
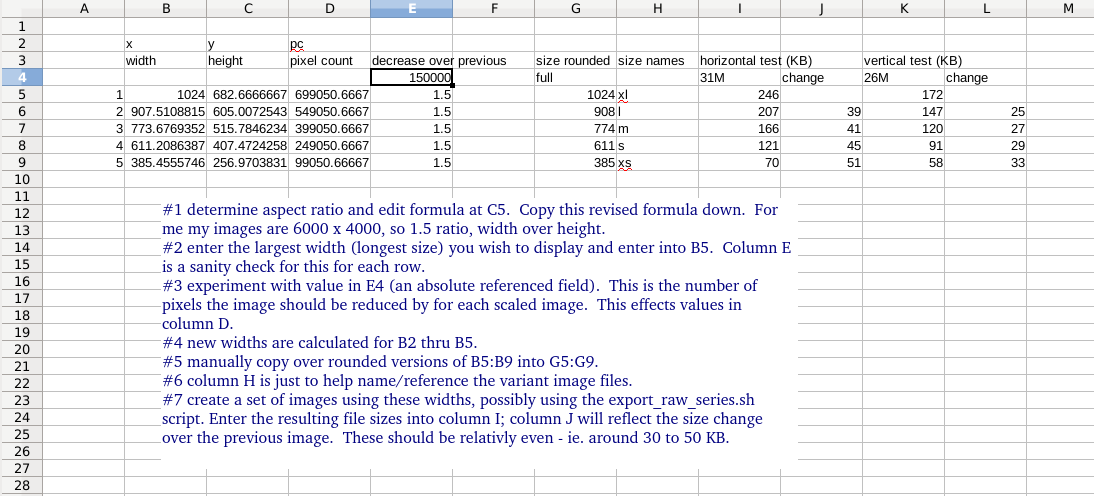
The problem is hard because jpeg compression makes file sizes unpredictable. This approach deals with that by assuming that an image’s size is somewhat relative to the total number of pixels in the image. Since in our case the images are going to be of the same image content just at different sizes, the jpeg compression will behave similarly for each.
The figure_out_image_scaling.ods spreadsheet allows you to choose a maximum size to display and does the math to determine a range of image sizes that spread the load out from large to small.
To create a set of images with these sizes, you can use the following script.
export_raw_series.sh --vertical --quality 90 image_file_base_name
The --vertical or --horizontal parameters indicate which orientation the image has. If vertical, you want the height to be the longest size.
The --quality parameter sets the jpg quality level for the sized images.
The script uses the darktable-cli command (part of darktable) to create .jpg files from the original raw .RAF file.
Note that the darktable-cli runs with the options defined in ~/.config/darktable/darktablerc.
In addition, note that darktable will export the raw image using both the raw image file (e.g. .RAF) which is never modified, and the .RAF.xmp file that darktable creates when you edit a raw image. This file contains the edits to be applied, like cropping, etc. As a result, when this script runs, those edits will be reflected in the final images generated.
In addition to creating the image set of files for the sizes you need, it also exports a full size image jpg with quality 99.
Now the script:
#!/bin/bash

# https://stackoverflow.com/a/14203146
POSITIONAL=()
VERTICAL=false
QUALITY=90
FULL_SIZE_QUALITY=99
SIZES=(385 611 774 908 1024)
while [[ $# -gt 0 ]]
do
key="$1"

case $key in
    -v|--vertical|-l|--landscape)
    VERTICAL=true
    shift # past argument
    ;;
    -h|--horizontal|-p|--portrait)
    VERTICAL=false
    shift # past argument
    ;;
    -q|--quality)
    QUALITY="$2"
    shift # past argument
    shift # past value
    ;;
    *)    # unknown option
    POSITIONAL+=("$1") # save it in an array for later
    shift # past argument
    ;;
esac
done
set -- "${POSITIONAL[@]}" # restore positional parameters
if [ "$VERTICAL" = true ] ; then
    darktable-cli $1.RAF $1-full-$FULL_SIZE_QUALITY.jpg --core --conf plugins/imageio/format/jpeg/quality=$FULL_SIZE_QUALITY
    for s in ${SIZES[@]}; do
        darktable-cli $1.RAF $1-$s-$QUALITY.jpg --height $s --core --conf plugins/imageio/format/jpeg/quality=$QUALITY
    done
else
    darktable-cli $1.RAF $1-full-$FULL_SIZE_QUALITY.jpg --core --conf plugins/imageio/format/jpeg/quality=$FULL_SIZE_QUALITY
    for s in ${SIZES[@]}; do
        darktable-cli $1.RAF $1-$s-$QUALITY.jpg --width $s --core --conf plugins/imageio/format/jpeg/quality=$QUALITY
    done
fi
Edit the SIZES line to match the sizes that you determined for the images earlier.
